Mastodon with docker rootless, compose, and nginx reverse proxy
Published: 2023-12-12, Revised: 2024-04-26

TL;DR Everyone talks about docker rootless, e.g. for security reasons, but no one actually seems to do it. Very little information is available. Migrations from rootfull systems? File permissions? Reverse-proxy setup? Here I go through the steps to run Mastodon in a separate namespace with rootless docker and maintained in compose, served through the system nginx reverse proxy.
Info
This is for a single-user Mastodon instance, but it may as well be used for a larger number of users. In case you need to scale beyond a certain number of users, I suggest to follow the official docs and install from source on a dedicated VM.
Background#
I originally set up Mastodon with the default docker-compose.yml and jwilder's
nginx-reverse proxy.
However, I was not happy with mounting the docker socket into the reverse proxy container, which runs as root through docker. I also wanted to host multiple services on my VM and keep them all separate according to the separation of concerns principle.
After testing nginx-reverse proxy in docker rootless as well, I came to the conclusion to run the reverse proxy on the host, as suggested by Nick Janetakis 1, and all services in separate user namespaces with rootless docker.
Here's a graphic.
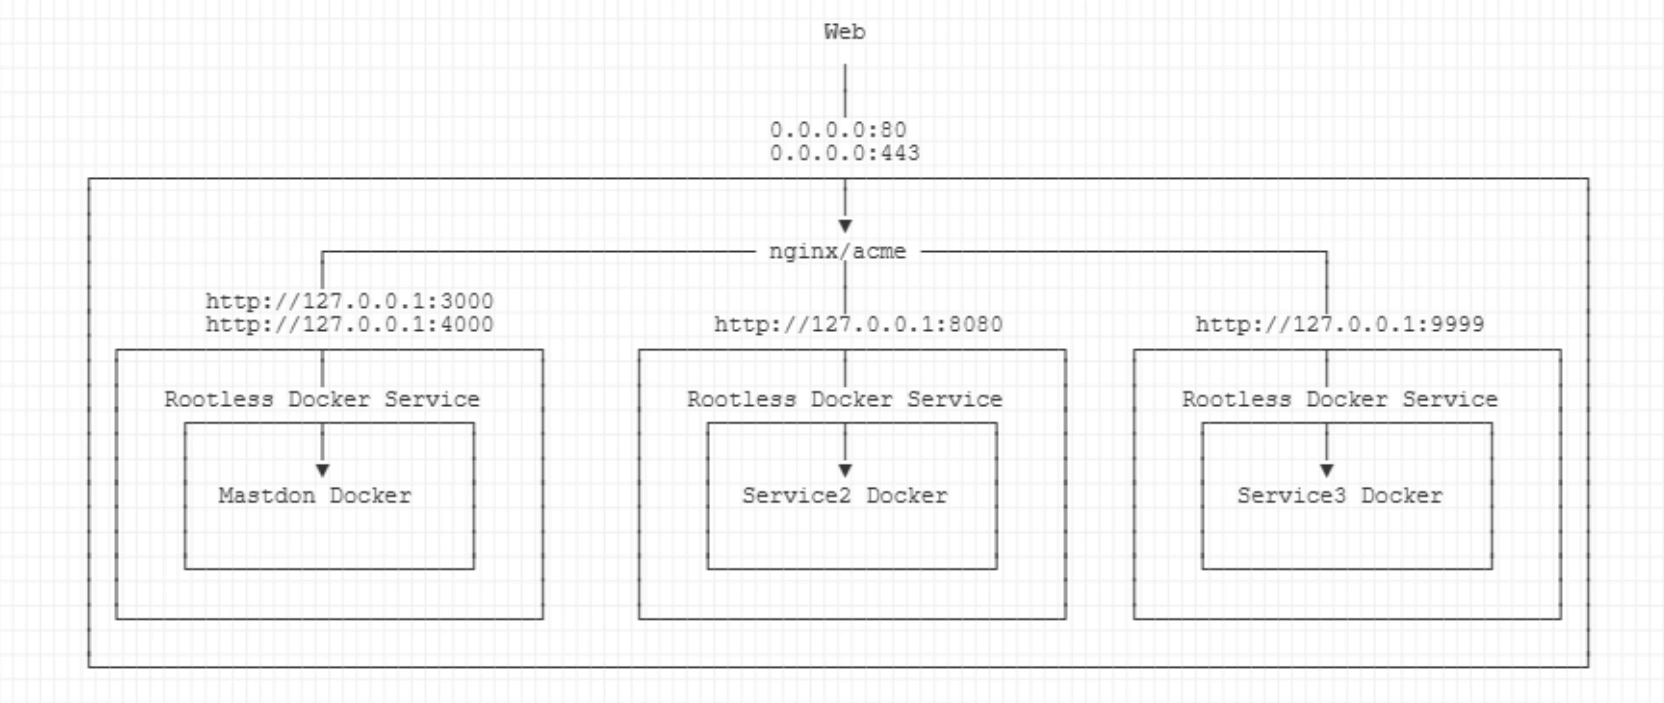
- nginx is installed on the host using
apt- all site configurations (
nginx.conf) are maintained here as well - nginx is responsible for SSL termination
- nginx forwards traffic to services with ports listening on localhost (
127.0.0.1)
- all site configurations (
- acme (Let's encrypt) runs alongside nginx to manage SSL certificates
- for each service (e.g.
Mastodon,Service1,Service2), a separate user is created- this user is not part of the
sudogroup and doesn't have a password set (login only through root) - these service-level users can only access files in their home directories, which is where all the persistent docker data is located
- for each user, a separate docker rootless service is used
- through
subuidandsubgidmappings, these users can make use of sub-namespace ranges in docker containers, such as the postgres container, which creates a non-root user by default
- this user is not part of the
Beyond these system considerations, there are many small pitfalls, which is why I converted this into a coherent blog post. Use what is relevant to you.
Preparations#
I will not go into every detail, especially if there is enough information already available.
The minimum requirement for this blog post is a domain pointing to the IP of your VM. I will use mastodon.example.com.
Note
Before copy & paste commands and configs below, check for any updates. I provide links where this is advised.
Docker rootless setup#
There are two main sources for this step. Docker's official documentation 2 and a blog post from Jitendra Patro 3. If you are migrating, I also found good hints for permission handling in the Nextcloud Repo.
Note
I tested below commands with Ubuntu 22.04. If you are using Debian
or other distros, check the links above for additional information.
In case you have a rootfull docker setup running already, stop the service and remove the socket.
systemctl stop docker.socket docker.service
systemctl disable --now docker.socket docker.service
rm /var/run/docker.sock
Install docker rootless dependencies:
sudo apt-get install uidmap dbus-user-session \
    systemd-container docker-ce-rootless-extras
Create a new user for Mastodon/Docker rootless:
sudo useradd -r -s /bin/bash -m -d /srv/mastodon -U mastodon
Info
-d specifies the user's home directory. For every user,
I recommend to create such a separate home directory under /srv,
to better organize things.
In order to allow this user to create its own sub-uids and sub-gids,
we need to update /etc/subuid and /etc/subgid files, according to the
Docker rootless docs. Just that the docs are somewhat short here.
Test if the mastodon user is already added:
grep mastodon: /etc/subuid
grep mastodon: /etc/subgid
This should not return anything.
Now, see if there are other users already added:
cat /etc/subuid
opc:100000:65536
ubuntu:165536:65536
I already have two users here (you may spot that this is from the Oracle cloud).
The syntax is <user>:<start_id>:<how-many-ids>
What you now need to do is define the <start_id> for the new user subuids so that ranges don't overlap.
Info
If you have no users in /etc/subuid or /etc/subgid, the common <start_id> would be 100000.
In my case, the <start_id> for the new mastodon user is 165536 + 65536 = 231072, based on the <start_id> of last
existing user in the list (ubuntu).
Set these values below:
user=mastodon
start_id=231072
sudo usermod \
    --add-subuids $((start_id))-$((start_id+65535)) \
    --add-subgids $((start_id))-$((start_id+65535)) $user
This will update /etc/subuid and /etc/subgid files with the new ranges for the mastodon user.
The two files should look similar to this afterwards:
> opc:100000:65536
> ubuntu:165536:65536
> mastodon:231072:65536
The user mastodon now has its own range of uids and gids to use for creating child processes
and managing permissions (e.g. inside rootless docker containers).
Login to the user with
machinectl shell mastodon@
Note
machinectl will automatically set up
XDG_RUNTIME_DIR environment variables, see 3.
Do not use e.g. sudo -u mastodon -H bash.
Install docker rootless:
dockerd-rootless-setuptool.sh install
This will install docker rootless as a systemd service.
Info
The following is a note from the docs with additional information.
The location of systemd configuration files are different when running Docker in rootless mode. When running in rootless mode, Docker is started as a user-mode systemd service, and uses files stored in each users' home directory in
~/.config/systemd/user/docker.service.d/. In addition,systemctlmust be executed withoutsudoand with the--userflag.
Copy the output for the two environment variables that are shown at the end.
Append these to the ~/.bashrc of the mastodon user:
nano ~/.bashrc
Add:
export PATH=/usr/bin:$PATH
export DOCKER_HOST=unix:///run/user/998/docker.sock
This is just an example, the user id may be different in your case.
Info
For convenience, you may also add a cd ~/docker at the end of
the .bashrc file. Upon user login, this will automatically cd
into the directory we later create that is hosting the docker-compose.yml.
Reload ~/.bashrc:
source ~/.bashrc
Start the Docker daemon and check that it is running:
systemctl --user start docker
systemctl --user status docker
docker ps
# no containers so far
> CONTAINER ID   IMAGE     COMMAND   CREATED   STATUS    PORTS     NAMES
Make sure that docker is using overlay2 filesystem:
docker info | grep -A 7 "Storage Driver:"
Output
Storage Driver: overlay2
WARNING: No cpu cfs quota support
WARNING: No cpu cfs period support
[...]
Backing Filesystem: xfs
Supports d_type: true
Using metacopy: false
Native Overlay Diff: false
userxattr: true
Logging Driver: json-file
Cgroup Driver: systemd
Info
You can see a number of warnings that indicate that you are running docker without root privileges. Unless you are using Docker images that require special permissions, this will not have an effect.
Enable the docker service on startup:
systemctl --user enable docker
We also need to enable lingering to make this work with rootless docker. Logout from the mastodon user first, then check with the second command afterwards.
# CTRL+D
sudo loginctl enable-linger mastodon
sudo loginctl show-user mastodon
Linger=yes
Info
This is it for Docker rootless. You should now be able to proceed regularly with any
Docker setup. If you need to bind to privileged ports (<1000), there are additional
steps.
But we will bind our Mastodon service to the standard ports :3000 and :4000 on localhost, which
do not require any special permissions.
Mastodon setup#
Info
There are many ways to do this and you will find many good (and bad) guides. I prefer to stick with the official docs and official images whenever possible. However, feel free to use other images. For instance, linuxserver.io provides a Mastodon image that features some improvements such as compatibility with automatic updates via Watchtower. I haven't tested this image.
Prepare the folder structure for persistent data.
machinectl shell mastodon@
cd ~
mkdir -p data/postgres14
mkdir -p data/public
mkdir -p data/redis
mkdir docker
Get the docker-compose.yml and .env samples from the official Mastodon repo.
cd docker
wget https://raw.githubusercontent.com/mastodon/mastodon/main/.env.production.sample
cp .env.production.sample .env.production
wget https://raw.githubusercontent.com/mastodon/mastodon/main/docker-compose.yml
Adapt the volume mounts in docker-compose.yml.
This is how the yml may look afterwards
version: '3'
services:
  db:
    restart: always
    image: postgres:14-alpine
    container_name: mastodon-db
    shm_size: 256mb
    networks:
      - internal_network
    healthcheck:
      test: ['CMD', 'pg_isready', '-U', 'postgres']
    volumes:
      - /srv/mastodon/data/postgres14:/var/lib/postgresql/data
    environment:
      - 'POSTGRES_HOST_AUTH_METHOD=trust'

  redis:
    restart: always
    image: redis:7-alpine
    networks:
      - internal_network
    container_name: mastodon-redis
    healthcheck:
      test: ['CMD', 'redis-cli', 'ping']
    volumes:
      - /srv/mastodon/data/redis:/data

  web:
    image: tootsuite/mastodon:${TAG:-latest}
    container_name: mastodon-web
    restart: always
    env_file: .env.production
    command: bundle exec puma -C config/puma.rb
    networks:
      - external_network
      - internal_network
    healthcheck:
      test: ['CMD-SHELL', 'wget -q --spider --proxy=off localhost:3000/health || exit 1']
    ports:
      - '127.0.0.1:3000:3000'
    depends_on:
      - db
      - redis
    volumes:
      - /srv/mastodon/data/public/system:/mastodon/public/system

  streaming:
    image: tootsuite/mastodon:${TAG:-latest}
    container_name: mastodon-streaming
    restart: always
    env_file: .env.production
    command: node ./streaming
    networks:
      - external_network
      - internal_network
    healthcheck:
      # prettier-ignore
      test: ['CMD-SHELL', 'wget -q --spider --proxy=off localhost:4000/api/v1/streaming/health || exit 1']
    ports:
      - '127.0.0.1:4000:4000'
    depends_on:
      - db
      - redis

  sidekiq:
    image: tootsuite/mastodon:${TAG:-latest}
    container_name: mastodon-sidekiq
    restart: always
    env_file: .env.production
    command: bundle exec sidekiq
    depends_on:
      - db
      - redis
    networks:
      - external_network
      - internal_network
    volumes:
      - /srv/mastodon/data/public/system:/mastodon/public/system
    healthcheck:
      test: ['CMD-SHELL', "ps aux | grep '[s]idekiq\ 6' || false"]

networks:
  external_network:
  internal_network:
    internal: true
You may notice that I changed some more lines. I added explicit container_name to
all services. The reason is that compose will prepend the folder-name to docker
services. We store our docker-compose.yml in the ~/docker directory, which means
that all services would be named docker-.... With the explicit names, I can easily
exec into containers via their unique names (see #debugging).
Info
The only ports that are exposed (on the host's localhost) are '127.0.0.1:3000:3000' (web) and
'127.0.0.1:4000:4000' (streaming). This is where the nginx-reverse-proxy that is running on the host will hand
over connections.
There is also a ${TAG:-latest}. I recommend setting this explicit version
tag, so you can pull updates manually. In order for this to work, create an .env
file and add the latest release version.
nano .env
Add the following and save the .env file.
# the Mastodon version tag to use
TAG=v4.2.3
Generate a configuration with:
docker compose run --rm web rake mastodon:setup
.env.production file.
For information on settings, also see the Mastodon docs.
The relevant variables for me were:
LOCAL_DOMAIN=mastodon.example.com
SINGLE_USER_MODE=true
DEFAULT_LOCALE=en
DB_PASS=...
For generating the three secrets:
PAPERCLIP_SECRET=...
SECRET_KEY_BASE=...
OTP_SECRET=...
..you can also run (three times):
docker compose run --rm web bundle exec rake secret
..and:
docker compose run --rm web bundle exec rake mastodon:webpush:generate_vapid_key
VAPID_PRIVATE_KEY=...
VAPID_PUBLIC_KEY=...
Disable SINGLE_USER_MODE for now, to be able to register first:
# SINGLE_USER_MODE=true
Other settings:
ES_ENABLED=false
S3_ENABLED=false
Add a web-finger if you are running on a subdomain.
At this stage, I also added a file to my main web server at example.com/.well-known/webfinger with the following content:
{"subject":"acct:alex@mastodon.example.com","aliases":["https://.example.com/@alex","https://.example.com/users/alex"],"links":[{"rel":"http://webfinger.net/rel/profile-page","type":"text/html","href":"https://example.com/@alex"},{"rel":"self","type":"application/activity+json","href":"https://example.com/users/alex"},{"rel":"http://ostatus.org/schema/1.0/subscribe","template":"https://example.com/authorize_interaction?uri={uri}"}]}
@alex@example.com as a user-reference, without the subdomain.
If you are running Mastodon directly on a dedicated domain, this is not necessary.
Now you can start the Mastodon stack with:
cd ~/docker
docker compose up -d && docker compose logs --follow
Optional: Verify permissions
Info
The ~/data/public/system Mastodon folder which is bind-mounted to
/mastodon/public/system must be owned by user 991 inside the container. However, because we
are using subuid-mappings, this will be a different ID outside of the Mastodon docker container.
Exec into the container with sudo permissions:
docker exec -u root -it mastodon-web /bin/bash
# check owner with
ls -alh /mastodon/public/
# optionally chown
chown -R 991:991 /mastodon/public
991 should be shown as user mastodon inside the mastodon-web container.
From outside, a different subuid will be shown, based on the mapping:
ls -alh ~/data/public/system/
Output
drwxr-xr-x 4 232062 232062 36 Apr 26 2023 accounts
drwxr-xr-x 6 232062 232062 89 Apr 27 2023 cache
drwxr-xr-x 4 232062 232062 37 May 4 2023 media_attachments
drwxr-xr-x 3 232062 232062 19 Apr 26 2023 site_uploads
nginx reverse-proxy setup#
Info
You can install nginx reverse-proxy in its own rootless user-docker system. In this case, you will need to allow port binding for privileged ports, as described in the docker rootless docs.
I am using nginx on the host.
Install nginx using apt on the host. CTRL+D first if you are stilled logged into the mastodon user.
sudo apt-get update && sudo apt-get install nginx
Deactivate the default conf:
sudo rm /etc/nginx/sites-enabled/default
Create a new config off the official nginx.conf from the Mastodon Github repo and symlink to the sites-available folder.
cd /etc/nginx/sites-available/
sudo wget -O mastodon.example.com.conf \
    https://raw.githubusercontent.com/mastodon/mastodon/main/dist/nginx.conf
sudo ln -s /etc/nginx/sites-available/mastodon.example.com.conf /etc/nginx/sites-enabled/
Info
This nginx.conf from Mastodon is quite complex. There is not much information
available on how to use it or how to set this up with docker (users complained).
Below, you will find my modifications that worked for me. YMMV.
Edit the file:
sudo nano mastodon.example.com.conf
There are some things we need to change.
Click here to see individual instructions
First, comment or remove the block that specifies the upstream servers.
upstream backend {
    server 127.0.0.1:3000 fail_timeout=0;
}

upstream streaming {
    # Instruct nginx to send connections to the server with the least number of connections
    # to ensure load is distributed evenly.
    least_conn;

    server 127.0.0.1:4000 fail_timeout=0;
    # Uncomment these lines for load-balancing multiple instances of streaming for scaling,
    # this assumes your running the streaming server on ports 4000, 4001, and 4002:
    # server 127.0.0.1:4001 fail_timeout=0;
    # server 127.0.0.1:4002 fail_timeout=0;
}
I would get bad gateway errors (502) with these two upstream settings.
Also add the paths for the Let's encrypt certificates. We don't have these yet, but will get in the next step.
Search for the line ssl_certificate (nano: CTRL+W) and replace both with:
ssl_certificate /etc/letsencrypt/live/mastodon.example.com/fullchain.pem; # managed by Certbot
ssl_certificate_key /etc/letsencrypt/live/mastodon.example.com/privkey.pem; # managed by Certbot
There are two server blocks, one for port 80 and one for port 443.
In both of these sections, comment out the default root path:
# root /home/mastodon/live/public;
Since we are forwarding everything through localhost:3000 and
use rails to serve static files, we don't need these.
..and change server_name to your instance.
server_name mastodon.example.com
Farther below, change all entries of try_files $uri =404; to
try_files $uri @proxy;, according to the ominous comment:
# If Docker is used for deployment and Rails serves static files,
# then needed must replace linetry_files $uri =404;withtry_files $uri @proxy;.
Then, instead of the default $proxy_add_x_forwarded_for, I directly forwarded the
remote IP of the reverse proxy because this reduces
the surface for spoofing attacks.
Since I only have a single reverse proxy, I can directly send its remote address to Keycloak (instead of adding its IP to the chain).
proxy_set_header X-Forwarded-For $remote_addr;
Lastly, instead of:
proxy_pass http://streaming;
[...]
proxy_pass http://backend;
..use:
proxy_pass http://127.0.0.1:4000;
[...]
proxy_pass http://127.0.0.1:3000;
..or use the updated mastodon.example.com.conf directly.
cd /etc/nginx/sites-available/
sudo wget https://du.nkel.dev/blog/files/mastodon.example.com.conf
sudo ln -s /etc/nginx/sites-available/mastodon.example.com.conf /etc/nginx/sites-enabled/
Update all occurrences of mastodon.example.com with your domain.
sudo sed -i -e 's/mastodon.example.com/new.domain.com/g' mastodon.example.com.conf
Save the file (CTRL+o), test, and reload nginx:
sudo nginx -t
sudo systemctl reload nginx
SSL certificates#
We use acme to automate management of SSL certificates. This is a rather standard setup, so choose any of the guides available, e.g. 4 or 5.
Install certbot (Ubuntu):
sudo snap install core; sudo snap refresh core
sudo snap install --classic certbot
sudo ln -s /snap/bin/certbot /usr/bin/certbot
.. or Debian and others:
sudo apt-get update
sudo apt-get install certbot python-certbot-nginx
Get SSL certificates
sudo certbot --nginx -d mastodon.example.com
Y twice.
On certbot issues
If you copied the above nginx configuration, it already contains
references to SSL certificates. In this case, nginx -t may
complain that folders or files are missing, or that no SSL certificates
are provided despite having a location with listen 443.
The solution here is to split the first SSL retrievel with certbot into two commands. Before doing this, make sure that the following four lines are commented out:
    # listen 443 ssl http2;
    # listen [::]:443 ssl http2;
    # ssl_certificate /etc/letsencrypt/live/mastodon.example.com/fullchain.pem;
    # ssl_certificate_key /etc/letsencrypt/live/mastodon.example.com/privkey.pem;
Then retrieve SSL certificates with this (without actually installing them).
sudo certbot certonly --nginx -d mastodon.example.com
Fix your mastodon.example.com.conf, by uncommenting the four lines above, and install certificates with:
sudo certbot install --cert-name mastodon.example.com
This will update the mastodon.example.com.conf with the
necessary instructions for Let's Encrypt and activate the
automatic renewal.
Saving debug log to /var/log/letsencrypt/letsencrypt.log
Deploying certificate
Successfully deployed certificate for mastodon.example.com
to /etc/nginx/sites-enabled/mastodon.example.com.conf
Verify auto-renewal:
systemctl status snap.certbot.renew.service
Test renewal:
sudo certbot renew --dry-run
Summary#
At this stage, you should be able to hit mastodon.example.com and create a new user.
Don't forget to set SINGLE_USER_MODE=true in the .env.production and then restart the mastodon docker stack:
machinectl shell mastodon@
cd ~/docker
docker compose down && docker compose up -d
You can find some more hints below.
My resource consumption is about 1.2 GB Memory for the Mastodon stack, 1-2% CPU utilization and about 8GB HDD use (with daily prune).
Resource consumption
docker stats
> CONTAINER ID   NAME                 CPU %     MEM USAGE / LIMIT     MEM %     NET I/O           BLOCK I/O   PIDS
> eda607eee567   mastodon-web         0.00%     625.9MiB / 23.43GiB   2.61%     159MB / 259MB     0B / 0B     32
> f0c6b77d9d3b   mastodon-streaming   0.00%     43.86MiB / 23.43GiB   0.18%     1.53MB / 1.61MB   0B / 0B     15
> 6e91d29ee618   mastodon-sidekiq     0.00%     436.3MiB / 23.43GiB   1.82%     2.94GB / 1.21GB   0B / 0B     20
> ef5f5f1af5ea   mastodon-redis       0.00%     10.91MiB / 23.43GiB   0.05%     1.1GB / 554MB     0B / 0B     6
> 5678e51ef944   mastodon-db          0.00%     168.8MiB / 23.43GiB   0.70%     195MB / 783MB     0B / 0B     11
sudo du -sh /srv/mastodon/data
> 8.9G    /srv/mastodon/data
Maintenance#
If there is a new Mastodon release available, login to the Mastodon user, edit the .env file and update with the new version tag.
machinectl shell mastodon@
cd ~/docker
nano .env
# check latest version
# https://github.com/mastodon/mastodon/releases
docker compose pull
docker compose run --rm web rails db:migrate
docker compose up -d && docker compose logs --follow
Periodic cleanup task:
docker compose run --rm web bundle exec bin/tootctl media remove
docker compose run --rm web bundle exec bin/tootctl preview_cards remove
docker compose run --rm web bundle exec bin/tootctl media remove-orphans
Check disk space:
docker compose run --rm web bundle exec bin/tootctl media usage
> Attachments:    598 MB (3.02 MB local)
> Custom emoji:   51.4 MB (0 Bytes local)
> Preview cards:  276 MB
> Avatars:        906 MB (31.2 KB local)
> Headers:        2.21 GB (102 KB local)
> Backups:        0 Bytes
> Imports:        0 Bytes
> Settings:       611 KB
Since I am low on disk space, I added a cronjob to automate these cleanups daily. Note that this will slow down your Mastodon instance, since the cache is reset often.
sudo nano /etc/cron.daily/mastodon_auto_cleanup
#!/bin/sh

# If started as root, then re-start as user "mastodon":
if [ "$(id -u)" -eq 0 ]; then
    exec sudo -H -u mastodon $0 "$@"
    echo "This is never reached.";
fi

echo "This runs as user $(id -un)";
# prints "mastodon"

docker compose -f /srv/mastodon/docker/docker-compose.yml \
    run --rm web bundle exec bin/tootctl media remove

docker compose -f /srv/mastodon/docker/docker-compose.yml \
    run --rm web bundle exec bin/tootctl preview_cards remove
Save and make the file executable.
sudo chmod +x /etc/cron.daily/mastodon_auto_cleanup
Note
Check that your crontab actually runs these daily tasks. The entries should look similar to this:
# CTRL+D first, if logged in as user Mastodon
sudo crontab -e
23 * * * * root cd / && run-parts --report /etc/cron.hourly
1 4 * * * root  cd / && run-parts --report /etc/cron.daily
48 3 * * 7 root cd / && run-parts --report /etc/cron.weekly
25 3 8 * * root cd / && run-parts --report /etc/cron.monthly
Test with:
sudo bash /etc/cron.daily/mastodon_auto_cleanup
Removed 6304 media attachments (approx. 5.9 GB) Removed 1281 preview cards (approx. 41.5 MB)
Once in a while, you may also want to cleanup your docker images:
Warning
Make sure all containers are running. The following command may otherwise purge images still in use (your persistent data, however, is safe, if you followed this guide and used bind-mounts).
sudo -u mastodon -H bash
# check that Mastodon is running
docker ps
# show docker disk use
docker system df -v
# cleanup unused images
docker system prune
docker image prune -a
Note
Docker rootless will be automatically kept up to date if you installed it with
the docker-ce-rootless-extras RPM/deb package.
Automatic updates#
Automatic updates are not suggested. But I found them reliable and easy enough to activate
for PATCH releases (e.g. x.x.2 to x.x.3, where the different digits refer to MAJOR.MINOR.PATCH).
We can update our mastodon_auto_cleanup daily task to include this.
First, edit your .env and change the version number to only include the first two
digits:
TAG=v4.2
The v4.2
image is automatically updated for any patch release (4.2.2, 4.2.3 etc.).
Then edit mastodon_auto_cleanup and add:
# upgrade
docker compose -f /srv/mastodon/docker/docker-compose.yml pull
docker compose -f /srv/mastodon/docker/docker-compose.yml run --rm web rails db:migrate
docker compose -f /srv/mastodon/docker/docker-compose.yml up -d
This will check for updates once daily. If no new versions or migrations are available, the containers will continue to run.
Any MINOR or MAJOR updates must be pulled manually, by editing .env and executing
the thee commands from above.
Security#
Once you are finished with the setup, it is a good idea to check open ports from another computer, just in case. Only the following three ports should be open:
sudo nmap <IP-of-your-vm>
> Starting Nmap 7.80 ( https://nmap.org ) at 2023-12-09 07:09 CET
> Nmap scan report for ...........
> Host is up (0.016s latency).
> Not shown: 997 filtered ports
> PORT    STATE SERVICE
> 22/tcp  open  ssh
> 80/tcp  open  http
> 443/tcp open  https
Enable automatic security updates on the host:
sudo dpkg-reconfigure -plow unattended-upgrades
Install ufw firewall and open ports for SSH, HTTP, and HTTPS.
sudo apt-get install ufw
sudo ufw default allow outgoing
sudo ufw default deny incoming
sudo ufw allow 22 comment 'SSH'
sudo ufw allow http comment 'HTTP'
sudo ufw allow https comment 'HTTPS'
Enable ufw firewall:
sudo ufw enable
sudo systemctl enable ufw
sudo systemctl start ufw
sudo ufw status
sudo systemctl status ufw
Configure fail2ban to use ufw:
sudo apt install fail2ban
sudo cp /etc/fail2ban/jail.conf /etc/fail2ban/jail.local
Edit the file:
sudo nano /etc/fail2ban/jail.local
Uncomment and set banaction to ufw in the [default] section:
banaction = ufw
banaction_allports = ufw
And int the [sshd] section, use:
port    = ssh
logpath = %(sshd_log)s
enabled = true
backend = systemd
Restart fail2ban and show status:
sudo systemctl restart fail2ban
sudo systemctl status fail2ban --no-pager --full
List fail-2-banned:
sudo fail2ban-client status sshd
Output
Status for the jail: sshd
|- Filter
|  |- Currently failed: 30
|  |- Total failed:     1264
|  |- Journal matches:  _SYSTEMD_UNIT=sshd.service + _COMM=sshd
|- Actions
|- Currently banned: 11
|- Total banned:     108
|- Banned IP list: ...
Backups#
These are the folders that would need periodic backups:
# nginx config
/etc/nginx/sites-available/
# .env.production settings, .env version info, docker-compose.yml:
/srv/mastodon/docker/
# persistent data:
/srv/mastodon/data/
You can also make a database dump directly:
sudo -u mastodon -H bash
# cd ~/docker
docker compose exec mastodon-db /bin/bash
pg_dumpall -U postgres \
    -f /tmp/mastodon_db_pg_dumpall_output_"`date +\%Y-\%m-\%d`".sql
tail /tmp/mastodon_db_pg_dumpall_output_"`date +\%Y-\%m-\%d`".sql
# CTRL+D
mkdir ~/backups
docker cp mastodon-db:/tmp/ \
    mastodon_db_pg_dumpall_output_"`date +\%Y-\%m-\%d`".sql ~/backups/
Migration to rootless docker#
I migrated my Mastodon from rootfull docker to rootless.
The tricky part here are file permissions, which must be updated for persistent data.
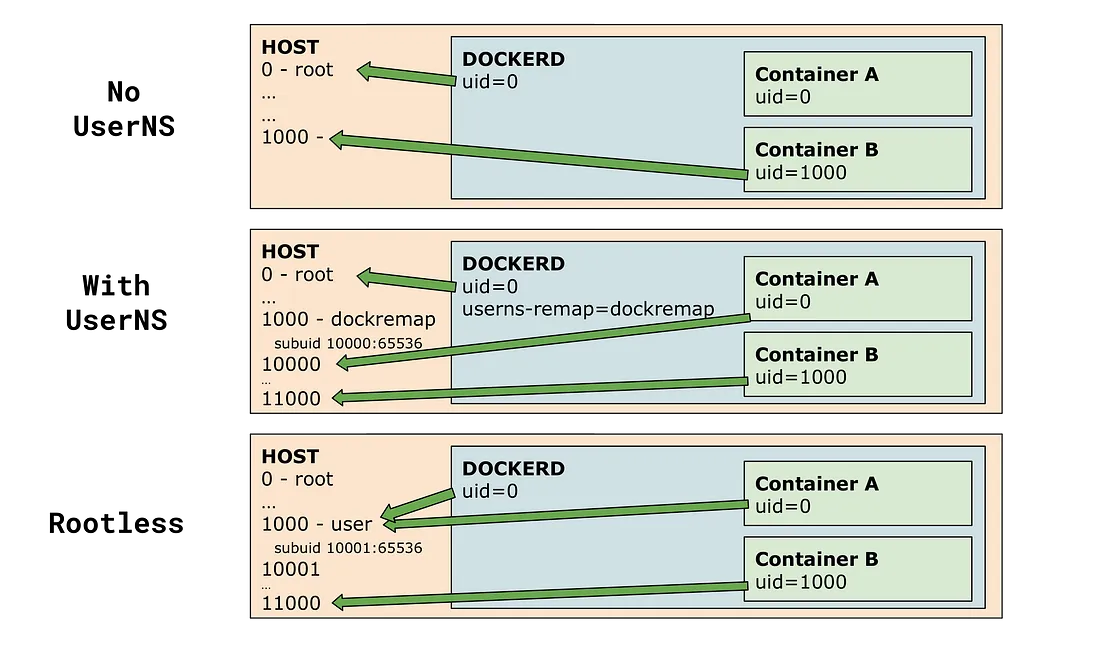
First, some basic knowledge on permission handling in rootless docker (shamelessly cited from podman, which works the same in this sense:
It is also helpful to distinguish between running Podman as a rootless user, and a container which is built to run rootless. If the container you're trying to run has a USER which is not root, then when mounting volumes you must use --userns=keep-id. This is because the container user would not be able to become root and access the mounted volumes.
keep-id is not available in Docker, but images exist that create a non-root user inside
the container, for security reasons. The Postgres and Mastodon containers are both examples. Postgres creates
a user and group with id 70 inside the container. Mastodon uses id 991 for the public data
directory inside the container.
In a rootfull setup, both IDs would be the same when viewed in the external mount point.
More info
This is a graphic from Tõnis Tiigi on Medium 6 that helped me to understand the changes between the different modes to run docker.
If you migrate, you will have to reset these ownerships because of our subuid and subgid
mappings. The best way to do this is from within the container.
If your container does not start at all, you have to first fix permissions outside of the container. For example, in case of postgres:
cd /srv/mastodon/data
chown -h --from=70 -Rc mastodon postgres14
chown -h --from=:70 -Rc :mastodon postgres14
This command will change all file owners from 70 to the rootless mastodon user, which is seen
as root from inside of the container. It will leave all other owners/groups in place (a safeguard).
Then, start the container and exec into it.
docker compose start mastodon-db
# exec as user root into the container
# because no sudo is available
docker exec -u root -it mastodon-db /bin/bash
cd /var/lib/postgresql/data
ls -alh
Output
total 68K
drwx------ 19       70 root     4.0K Dec  5 18:05 .
drwxrwxr-x  9 mastodon mastodon  103 Apr 25  2023 ..
-rw-------  1       0       0    3 Apr 26  2023 PG_VERSION
drwx------  6       0       0   58 Sep 22 13:58 base
drwx------  2       0       0 4.0K Dec  9 03:01 global
drwx------  2       0       0    6 Apr 26  2023 pg_commit_ts
drwx------  2       0       0    6 Apr 26  2023 pg_dynshmem
-rw-------  1       0       0 4.9K Apr 26  2023 pg_hba.conf
-rw-------  1       0       0 1.6K Apr 26  2023 pg_ident.conf
drwx------  4       0       0   68 Dec  9 05:36 pg_logical
drwx------  4       0       0   36 Apr 26  2023 pg_multixact
drwx------  2       0       0    6 Apr 26  2023 pg_notify
You can see that 0:0 is assigned as no user exists
in the postgres container anymore for this ID.
Fix postgres ownership to the rootless postgres user inside the container with id 70:70:
chown -R 70:70 .
# or
chown -R postgres:postgres .
I had to repeat the same for mastodon-web and folder /mastodon/public/system
with user id 991 (named mastodon inside) and dump.rdb file for mastodon-redis.
Debugging#
There are many ways to debug this system and with docker, they get more nested.
Logging is your friend. Check the nginx logs first:
tail -f /srv/nginx/data/logs/error.log
tail -f /srv/nginx/data/logs/access.log
To check/listen to the Mastodon container logs:
sudo -u mastodon -H bash
cd ~/docker
docker compose logs --follow
Tip
It is also good to have byobu installed, to switch between terminals.
Use wget to test the connection from the host:
wget -S -O /dev/null http://127.0.0.1:4000/
Output
--2023-12-09 18:31:10--  http://127.0.0.1:4000/
Connecting to 127.0.0.1:4000... connected.
HTTP request sent, awaiting response...
HTTP/1.1 400 Bad Request
X-Powered-By: Express
X-Request-Id: f83e837f-2b50-1a44-a87a-63019a05d4a5
Access-Control-Allow-Origin: *
Access-Control-Allow-Headers: Authorization, Accept, Cache-Control
Access-Control-Allow-Methods: GET, OPTIONS
Content-Type: application/json
Date: Sat, 09 Dec 2023 18:31:10 GMT
Connection: keep-alive
Keep-Alive: timeout=5
Transfer-Encoding: chunked
2023-12-09 18:31:10 ERROR 400: Bad Request.
This is an example where I wanted to see what the Puma logs show. But could not find a way to do this
other than starting a puma process directly from within the mastodon-web container
on a separate port:
sudo -u mastodon -H bash
docker exec -u root -t -i mastodon-web /bin/bash
rm -f /mastodon/tmp/pids/server.pid; bundle exec rails s -p 3001
E, [2023-12-10T04:08:03.732007 #57] ERROR -- :
[ActionDispatch::HostAuthorization::DefaultResponseApp]
Blocked hosts: localhost:3001
E, [2023-12-10T04:08:06.086688 #57] ERROR -- :
[ActionDispatch::HostAuthorization::DefaultResponseApp]
Blocked hosts: localhost:3001
(this made me realize that Mastodon is configured by default to block connections from localhost).
-
Nick Janetakis, Why I Prefer Running nginx on My Docker Host Instead of in a Container ↩
-
Docker docs, Run the Docker daemon as a non-root user (Rootless mode) ↩
-
Jitendra Patro, Migrating Rootful Docker containers to Rootless Docker ↩↩
-
Alex Garnett, digitalocean.com, How To Secure Nginx with Let's Encrypt on Ubuntu 22.04 ↩
-
Amir Rawdat, nginx.com, Using Let’s Encrypt SSL/TLS Certificates with NGINX ↩
-
Tõnis Tiigi, medium.com, Experimenting with Rootless Docker ↩