IPSEC between OPNsense and pfSense
with one side behind Carrier-grade NAT or internal subnet
Published: 2022-11-12, Revised: 2024-02-13

TL;DR A site-to-site connection between pfSense/OPNsense with IPSEC is straight-forward. This post explains some of the peculiarities, needed to establish a connection, if one of the two sides is behind a Carrier-grade NAT or in an internal subnet. This can happen (e.g.) with an upstream WAN uplink that is dial-up, with a non-static IP. I also show how to do the routing with multiple subnets on one end, using Classless Inter-Domain Routing (CIDR). The different parts are largely separable, choose what's interesting to you.
Motivation
There is need for VPNs everywhere, either due to the work from home movement 1 or the increasing needs to liberate oneself from FAANG 2 3.
For site-to-site connections, I like IPSEC tunnels because of their lightweight, stable and fast encryption. Using IPSEC between two routers, there is no need to set up anything on clients. This is great for private use, too. Connect your parents and family members with a multi-home spanning private network, to share internal services or to privately communicate with each other.
I was in this situation recently where I wanted to extend our network, to include someone who is one of the oldest family members, struggling with technology and in need of help.
This was also a good experimental situation. I was not sure whether it is possible to run an IPSEC connection through another internal network (the neighbors Wifi), with no possibility to open any ports on the outside WAN.
Turns out, IPSEC can do this, through NAT Traversal (NAT-T) and a DNS API (e.g. Cloudflare).
At the same time, I wanted to try OPNsense, the new open-source sibling of pfSense. OPNsense and pfSense are still very similar. I ran pfSense for years at my main site, but considered switching for some time now due to the lack of development.
This overall context has a lot of interesting edges and I thought I share some of these experiences here.
Prerequisites#
- Have a public domain (AAA) that is set up with a DNS API (e.g. Cloudflare). Your VPN remains private and no ports on either side will need to be exposed.
- Have one site (in my case the "pfSense" side) with a static WAN address.
- The other side ("OPNsense") just needs a WAN uplink, which can be dynamic and behind CG NAT or a private network
Other Setup?
1 is not a must, but recommended from a security perspective. I am not a particular fan
of Cloudflare becoming more and more a walled garden. You can
replace Cloudflare with any supported DNS API provider.
A static IP (2) is good to have. The setup described here may also work with dynamic IPs
on both sides, YMMV.
Now, 3 complicates the whole setup. If you have both sides with a public,
static IP, then simply follow the official docs to setup IPSEC.
Overview of example values
I use placeholder values for IPs, URLs (etc.) to illustrate the example context here.
This can get confusing, so here's an overview of example values I used in this post.
Site A
- Hardware: Apu2d4
- Software:
pfSense 2.6.0 - WAN:
31.31.31.31(a static, public IP) - LAN:
192.168.0.0/17 - URL:
router.sitea.example.com(internal DNS)- points to (e.g.)
192.168.10.1
- points to (e.g.)
- Example service:
cloud.sitea.example.com(internal DNS)- a Nextcloud instance
192.168.40.50
Site B
- Hardware: Protectli FW4B - 4 Port Intel® J3160
- Software:
OPNsense 22.7.7_1-amd64 - WAN:
41.41.41.41- a public IP (e.g. DSL, or from a Service Provider with CGNAT)
- this IP may possibly change regularly
- this router/device needs to have NAT-T (Nat-Traversal) enabled, (which is a common default)
- WAN (local subnet):
192.168.55.21- DHCP IP at the WAN port of the Protectli
- may also change regularly
- LAN:
192.168.179.0/24 - URL:
router.siteb.example.com(internal DNS)- points to
192.168.179.1
- points to
Hardware#

This post is not hardware specific, you can install pfSense and OPNsense
on almost any computer. In the picture above you see my OPNsense
setup, a Protectli mini computer 4. The WAN hooks
up to a Wifi bridge that connects the Protectli, as a client,
to another Wifi network with Internet access (a dynamic IP). I added a second
WiFi to the LAN side because the Wifi module of Protectli is really only
good for administrative work.
Another option would be the Apu2d4, with which I had great experiences with
and using as the Site B example router.
DNS Setup#
A static site-to-site connection with IPSEC is commonly configured with two static IPs. This is one part of the security concept. With a dynamic IP on one side, the other side will need to be configured fully open. For this type of setup, a Road Warrior VPN setup (e.g. OpenVPN) is typically better.
There is a workaround, however, for setups where the dynamic IP changes just sometimes. Here, OPNsense can "announce" its external IP through a DNS API such as Cloudflare.
OPNsense has a service for updating DNS entries for various providers.
Check out Services > Dynamic DNS.
You have one problem though when the OPNsense does not know its public IP because (e.g.) it itself sits in a private subnet.
In this case, use the following workaround.
-
Make sure you have an AAA record for a Top Level Domain (TLD). For management purposes, the nameservers of my domain link to Cloudflare. You can use any DNS service with an API here. Login to (e.g.) Cloudflare and go to your domain
example.com > DNS. -
Add a new entry with a random string.

Above, the nameservers for example.com point to Cloudflare, but no traffic is actually routed.
We don't care about 99.99.99.99 - it does not matter whether routing traffic through Cloudflare
is enabled or disabled for this guide. We only use the DNS API.
We want the subdomain jashdejvmiuqlachhsqaxs.siteb.example.com to point to
the public WAN of our Protectli (so the IP can be queried by pfSense on the other side).
Set the entry to DNS only and the start value to 0.0.0.0.
-
Create a new API Token under
My Profile > API Tokens. If possible, you can limit this token to a subnet throughClient IP Address Filtering, which increases security. -
With your favorite shell of choice, login to OPNsense.
We are going to use a custom script, by Dominic Cerisano 5,
that will
- (1) query the external WAN IP first and then
- (2) set this IP through the Cloudflare API for our DNS entry.
cd /usr/local/opnsense/scripts/
mkdir myscripts
cd myscripts
vi cloudflare-ddns.sh
Trouble with vim?
I prefer nano over vim, but did not want to change my OPNsense.
There are a number of beginner guides for vim available (e.g. vim-101) that
should help you to get this step done. Here are the most important
commands:
ESC,:,q- exit without saving changesESC,:,wq- exit VIM & save changesESC,i- Switch to "Insert"-Mode, meaning you can copy & paste, or write regularlyESC,x- Remove a single character
Paste the following script from Dominic Cerisano 5 (or clone from the repo).
#!/bin/sh

AUTH_EMAIL=example@example.com
AUTH_KEY=** CF Authorization  key **
ZONE_ID=** CF Zone ID **
A_RECORD_NAME="dynamic"
A_RECORD_ID=** CF A-record ID from cloudflare-dns-id.sh **

# Retrieve the last recorded public IP address
IP_RECORD="/tmp/ip-record"
RECORDED_IP=`cat $IP_RECORD`

# Fetch the current public IP address
PUBLIC_IP=$(curl --silent https://api.ipify.org) || exit 1

# If the public ip has not changed, nothing needs to be done, exit.
if [ "$PUBLIC_IP" = "$RECORDED_IP" ]; then
    exit 0
fi

# Otherwise, your Internet provider changed your public IP again.
# Record the new public IP address locally
echo $PUBLIC_IP > $IP_RECORD

# Record the new public IP address on Cloudflare using API v4
RECORD=$(cat <<EOF
{ "type": "A",
  "name": "$A_RECORD_NAME",
  "content": "$PUBLIC_IP",
  "ttl": 180,
  "proxied": false }
EOF
)
curl "https://api.cloudflare.com/client/v4/zones/$ZONE_ID/dns_records/$A_RECORD_ID" \
     -X PUT \
     -H "Content-Type: application/json" \
     -H "X-Auth-Email: $AUTH_EMAIL" \
     -H "X-Auth-Key: $AUTH_KEY" \
     -d "$RECORD"
Capture WAN IP?
If your OPNsense is directly connected to the public WAN, you can use the above script, too. Replace:
PUBLIC_IP=$(curl --silent https://api.ipify.org) || exit 1
with:
PUBLIC_IP=$(/sbin/ifconfig pppoe0 | grep "inet" | awk '/inet / { print $2 }')
Make sure that pppoe0 is the correct key with ifconfig before.
You will need to update
AUTH_EMAILAUTH_KEYZONE_IDA_RECORD_NAMEA_RECORD_ID.
The first three are available in the Cloudflare dashboard.
A_RECORD_NAME is the subdomain we just created (e.g. jashdejvmiuqlachhsqaxs.siteb).
A_RECORD_ID must be queried using another script, provided by a friendly user
on Github. 6
# get all Cloudflare record IDs, select the one for our subdomain
curl -X GET "https://api.cloudflare.com/client/v4/zones/**zoneid**/dns_records?type=A" \
     -H "X-Auth-Email: example@example.com" \
     -H "X-Auth-Key: ** CF Authorization  key **" \
     -H "Content-Type: application/json"
- Test the script
chmod +x cloudflare-ddns.sh
sh cloudflare-ddns.sh
The script will
- (1) get the WAN IP through a query of
api.ipify.org, - (2) check if the IP did actually change (
/tmp/ip-record). - (3) If it did change, connect to Cloudflare and update the entry with the new IP.
Afterwards, login to Cloudflare and verify that the correct WAN is set.
- Automate
If everything works, we will need to add this script to OPNsense cronjobs.
There is a system to hooking up scripts to the GUI. You can, of course, edit cron directly. I followed the docs. 7
Create a new action:
cd /usr/local/opnsense/service/conf/actions.d/
vi actions_cf.conf
Paste the following:
[update]
command:/usr/local/opnsense/scripts/myscripts/cloudflare-ddns.sh
description:Update CF DynDNS
parameters:
type:script
message:Updating Cloudflare DNS IP
Test the action:
rm /tmp/ip-record
service configd restart
configctl cf update
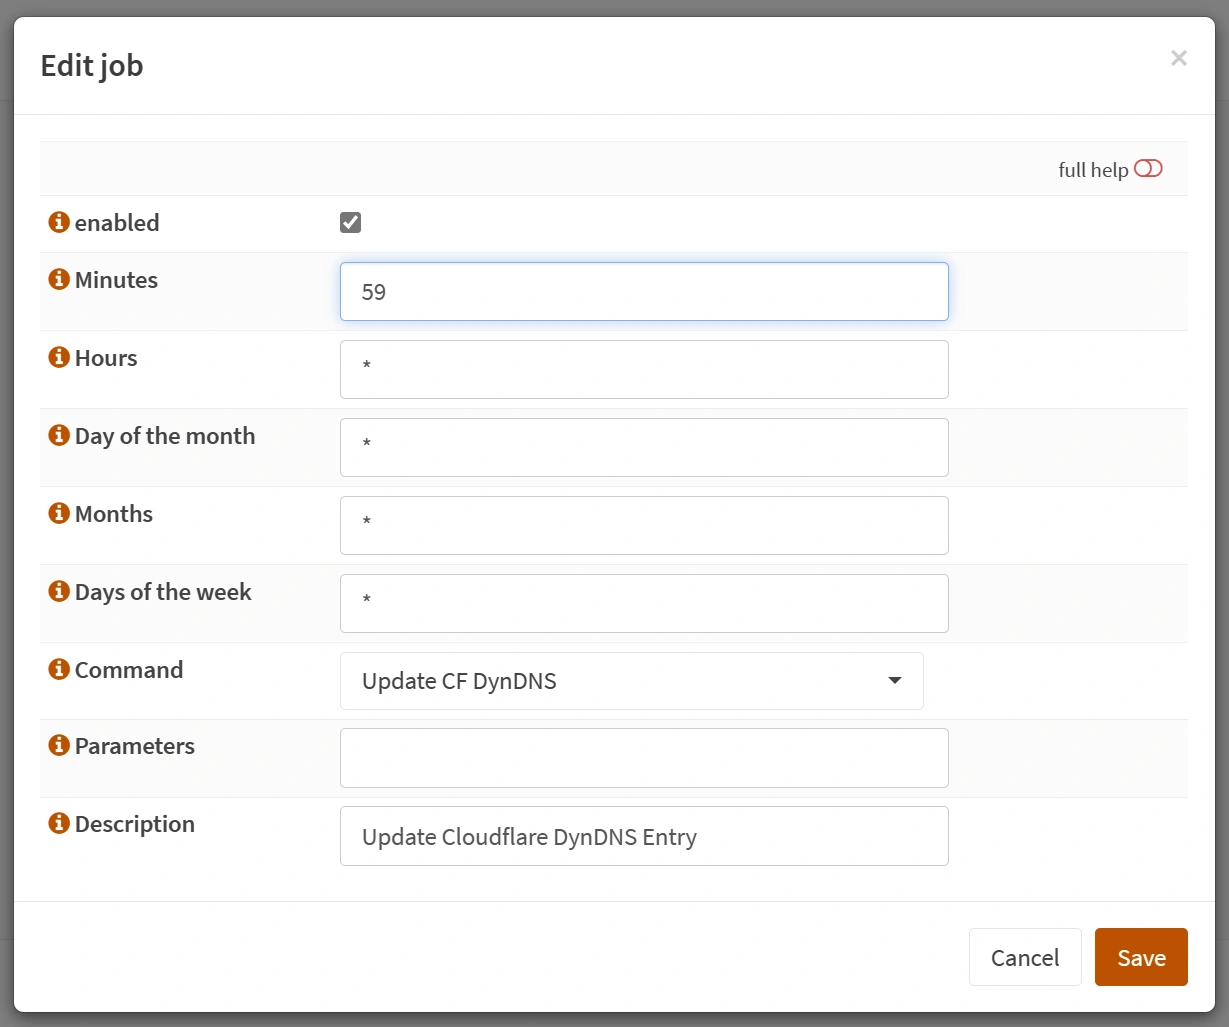
- Login to the OPNsense WebGUI and activate the cronjob
Go to System > Settings > Cron.
Click Add and select the new action with the name Update CF DynDNS.

In the example, the script would run every hour at 59 Minutes.
Note
Depending on how fast you want your IPSEC to re-establish after
a change of IP, you can set this lower or higher. For example, to
run the script every five minutes, use /5 in the "Minutes" field.
You can check the logging under opnsense.siteb.example.com/ui/diagnostics/log/core/configd:
> 2022-01-30T06:40:00   Informational   configd.py  message ... [cf.update] returned OK
> 2022-01-30T06:40:00   Notice  configd.py  [...] Updating Cloudflare DNS IP
- Optionally, set crontab hook to run script after reboot
After reboot, it would be wise to check the Cloudflare DNS entry immediately because of a possible new WAN IP.
cp /usr/local/etc/rc.syshook.d/start/90-cron /usr/local/etc/rc.syshook.d/start/91-dyndns
vi /usr/local/etc/rc.syshook.d/start/91-dyndns
#!/bin/sh

echo -n "Updating Cloudflare DynDNS.. "
sleep 15 && sh /usr/local/opnsense/scripts/myscripts/cloudflare-ddns.sh
Crontab?
Earlier, I used the below steps to add a crontab entry after reboot.
However, this was removed in the next OPNsense update (see topic=19815.0)
crontab -e
Add the following line, which will run the script 15 seconds after reboot.
@reboot (sleep 15 && sh /usr/local/opnsense/scripts/myscripts/cloudflare-ddns.sh) > /dev/null
OPNsense IPSEC#
This part more or less follows the official OPNsense docs. 8
In the example below, the LAN IP of OPNsense is 192.168.179.1 and pfSense can
be reached locally through 192.168.10.1.
Go to VPN > IPSEC and add a new phase1 entry.
Example phase1 settings
- Connection method:
Start immediateSince the OPNsense box is in a private network, it needs to actively initiate the IPSEC tunnel. - Key Exchange version:
V2 - Internet Protocol:
IPv4 - Interface: WAN.
- Remote gateway: The static WAN IP address of the other OPNsense/pfSense box.
- Uncheck Allow any remote gateway to connect - there is no way for the external world to reach the OPNsense box, if it sits in a subnet behind NAT.
- Description: Any Description, e.g.
SiteA-SiteB IPSEC - Authentication method: Mutual PSK
- My identifier
- Select
Dynamic DNS - and enter the domain we created in the first step
- e.g.
jashdejvmiuqlachhsqaxs.siteb.example.com
- Select
- Peer identifier: Peer IP address
- Pre-Shared Key: Create a new pre-shared key.
- the settings below are up to you:
- Encryption algorithm, e.g.
AESand256 - Hash algorithm, e.g.
SHA512 - DH key group, e.g.
21 (NIST EC 512 bits) - Lifetime, e.g. 3600
- Encryption algorithm, e.g.
- Install policy: Checked.
- Everything else unchecked below
- Except Dead Peer Detection: Checked
- e.g.
20seconds - and
5retries
- e.g.
- everything else unchecked/empty below
Click save and add a new phase2 entry for the phase1 we just created.
Example phase2 settings
- Disabled: unchecked
- Mode:
Tunnel IPv4 - Description:
IPSEC Network - Type:
Network - Address: e.g.
192.168.179.1/24 - Remote Network Type:
Network - Remote Network Address:
192.168.0.0/17See Routing for background information. - Phase 2 proposal (SA/Key Exchange)
- Protocol:
ESP
- Protocol:
- Encryption algorithms (your choice)
- e.g.
AES,256 bitsandaes256gcm16 - Hash algorithms: e.g.
SHA512 - PFS key group: e.g.
21 (NIST EC 512 bits) - Lifetime: e.g.
3600
- e.g.
- Automatically ping host: e.g.
192.168.10.1(the other box)
Info
AES 256 and aes256gcm16 and a DH with at least 3072-bit are recommended by the Commercial National Security Algorithm Suite.9
According to IBM and this SO post, DH 21 is a good pairing for >= AES 256 bits.
If you are using encryption or authentication algorithms with a 256-bit key or higher, use Diffie-Hellman group 21.
The choice of DH Group also affects speed:
The next generation encryption like DH19, DH20 or DH21 use elliptic curves and offers same level of security with smaller keys and thus with a reduced processing overhead.
Some attention will be needed to update these settings once in a while.
pfSense IPSEC#
Again, nothing surprising here. You can follow the official pfSense docs. 10
Go to VPN > IPSEC and add a new phase1 entry. Configuration of both sides must match.
Example phase1 settings
- Key Exchange version:
IKEv2 - Internet Protocol:
IPv4 - Interface: WAN.
- Remote gateway:
- Use the Dynamic DNS entry of the OPNsense box
- e.g.
jashdejvmiuqlachhsqaxs.siteb.example.com
- Description: e.g.
SiteB-SiteA IPSEC - Authentication method: Mutual PSK
- My identifier: e.g.
My IP address - Peer identifier:
Peer IP address - Pre-Shared Key: Use the pre-shared key from Site A
- the settings below are up to you:
- Encryption algorithm, e.g.
AES+256andAES256gcm16 - Hash algorithm, e.g.
SHA512 - DH key group, e.g.
21 (nist ecp 521) - Lifetime, e.g. 3600
- Encryption algorithm, e.g.
- Everything else unchecked/default
- Except Dead Peer Detection: Checked
- e.g.
20seconds - and
5retries
- e.g.
Example phase2 settings
- Disabled: unchecked
- Mode:
Tunnel IPv4 - Local Network:
Network - Type: e.g.
192.168.0.0/17(see Routing) - NAT/BINAT translation:
None - Remote Network Type:
Network - Remote Network Address:
192.168.179.1/24 - Phase 2 proposal (SA/Key Exchange)
- Protocol:
ESP
- Protocol:
- Encryption algorithms (your choice)
- e.g.
AES,256 bitsandAES256-GCM - Hash algorithms: e.g.
SHA512 - PFS key group: e.g.
21 (nist ecp 521) - Lifetime: e.g.
3600
- e.g.
- Automatically ping host: e.g.
192.168.179.1(the other box)
Firewall rules#
If you are using OPNsense in a private network, like in our example, you also need to disable the default rule to block private networks on WAN. 8 This is not necessary for pfSense, since it is available on a public and static IP in our example.
Go to Interfaces > WAN and uncheck “Block private networks”.
You will also need to add three rules for ingress traffic on the WAN interface for OPNsense, according to the docs.12
- Protocol ESP
- UDP Traffic on Port 500 (ISAKMP)
- UDP Traffic on Port 4500 (NAT-T)
Notes
-
The picture in the OPNsense docs shows TCP/UDP, whereas in the text it correctly says only UDP is needed.
-
Also note that I initially expected these rules would not be needed because OPNsense initiates the tunnel, but it looked like my tunnel only worked after explicitly adding these rules.
-
Finally, on the pfSense, rules for these ports need not to be added, since this is done automatically. Anyway, I prefer the OPNsense approach to make this more explicit.
Go to Firewall > Rules > WAN and add the three rules.

Info
In the above rules, you can also further limit the source IP range, for all three rules,
if your remote site has a static WAN IP, e.g. to 31.31.31.31 in the example here. This
will significantly reduce logging of malicious connection attempts in the IPSEC logs.
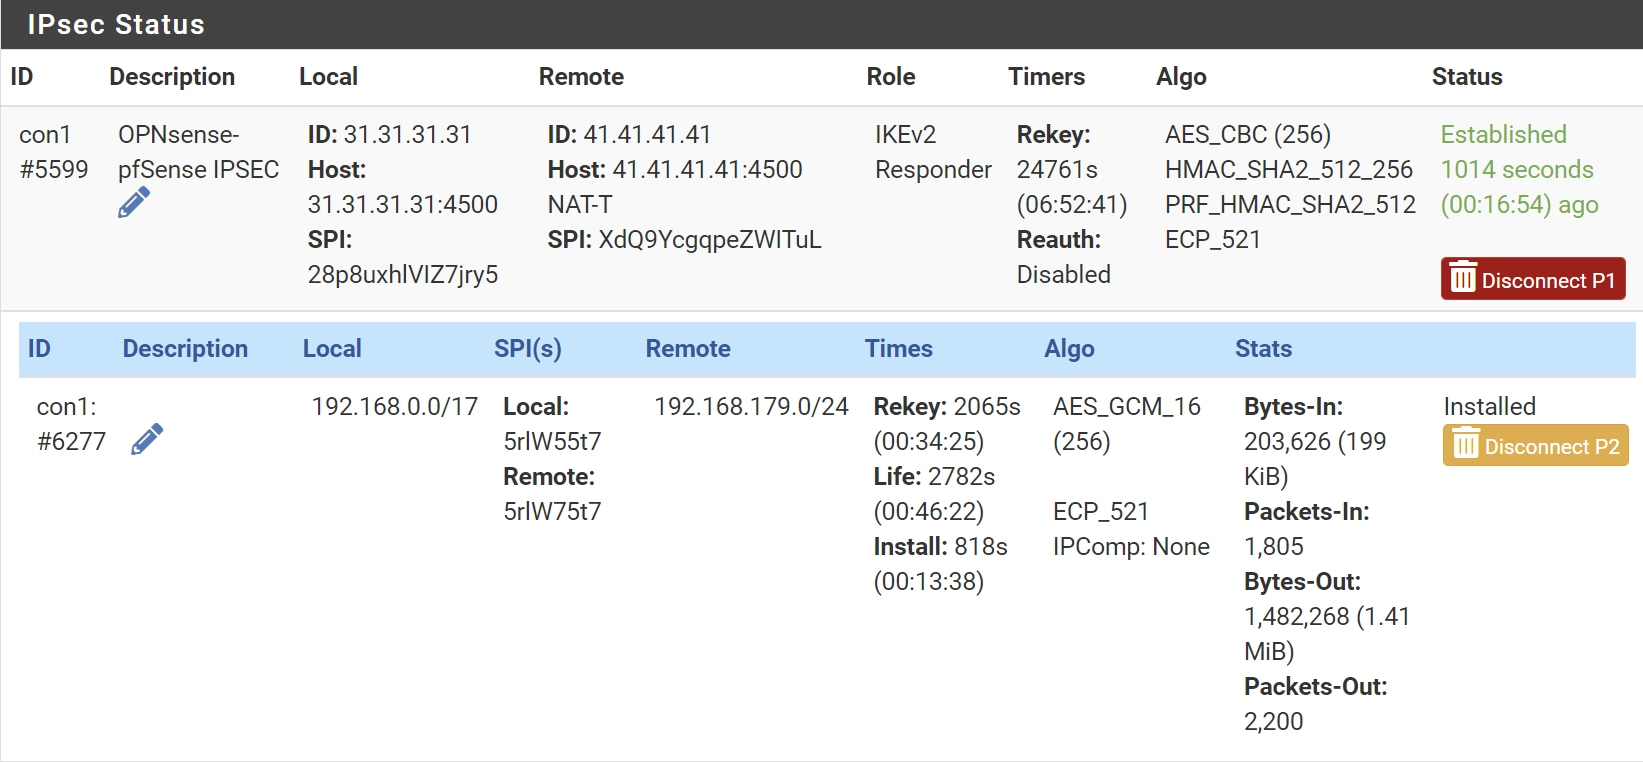
At this point you should see the IPSEC tunnel becoming available.

On pfSense, this will look very similar.

If not, restart both pfSense and OPNsense and give both some time to update IPs. Have a look at Debugging, where I list some common approaches.
Routing#
Note the difference between Routing, DNS, and SSL
It is good to memorize that Routing, DNS, and SSL are three separate things.
- Through
DNS, clients can get the actual IPs for services (URLs, e.g.nextcloud.sitea.example.com->192.168.40.50) Routing, on the other hand, affects how traffic actually reaches its destination IP. The client does not need to know the full routing path, just where to send the initial packet (the Gateway). In our case, this is OPNsense and it will need to be configured to forward packets to the remote side- Lastly,
SSLis used to verify to clients that a service is actually who it claims to be. This is entirely optional, but very recommended and easy to set up using Let's encrypt, see SSL.
Routing Site B
Let's specify the routing part. In the example above, we have two obvious subnets,
192.168.10.0 (pfSense net) and 192.168.179.0 (OPNsense net).
The routing for these two basic networks are automatically added, when using the Install policy option
in the IPSEC settings. Also note the docs.11
Most Site-to-Site VPNs are policy-based, which means you define a local and a remote network (or group of networks).
However, nothing prevents us to have additional
subnets on both sides, e.g. pfSense VLANs 192.168.20.1, 192.168.30.1 and 192.168.40.1.
For instance, I use VLANs to separate my network into different security zones, which makes
management much easier.
OPNsense, however, doesn't know which VLANs are on the pfSense side. In order to decide
that traffic to (e.g.) the IP 192.168.40.50 (our imaginary nextcloud service from above) needs
to be routed through the IPSEC tunnel, additional routing information must be added.
If you haven't noticed: We did this already, by using a subnet mask 192.168.0.0/17. This is
a neat trick, using CIDR Subnet Mask Notation, that offers the benefits of using policy-based automatic routing
while also allows to specify a range of selected subnets to be routed.
The bigger prefix 17 (Subnet Mask) means that OPNsense will route
every packet for destination IPs < 192.168.127.0 through the IPSEC tunnel, and let pfSense on the other side
decide what to do with these packets. Every packet for IPs >= 192.168.127.0 will not be routed through the tunnel.
Info
Check this Subnet Calculator for IPV4 Prefix/Subnet Mask results.
Routing Site A
If you do not want to route traffic from Site A to Site B, nothing needs to be done on the pfSense side,
I wanted to access OPNsense from Site A, which requires adding a Gateway and Static Route.13
Quote from Fred Wright from the pfSense docs
Due to the way IPsec tunnels are kludged into the FreeBSD kernel, any traffic initiated by m0n0wall to go through an IPsec tunnel gets the wrong source IP (and typically doesn’t go through the tunnel at all as a result). Theoretically this shouldn’t be an issue for the server side of SNMP, but perhaps the server has a bug (well, deficiency, at least) where it doesn’t send the response out through a socket bound to the request packet. You can fake it out by adding a bogus static route to the remote end of the tunnel via the m0n0wall’s LAN IP (assuming that’s within the near-end tunnel range). A good test is to see whether you can ping something at the remote end of the tunnel (e.g. the SNMP remote) from the m0n0wall. There’s an annoying but mostly harmless side-effect to this - every LAN packet to the tunnel elicits a no-change ICMP Redirect.
See the pfSense docs and two pictures from Gateway/Static Routes section.
pfsense System > Routing > Gateways

pfsense System > Routing > Static Routes

My observation was that this is not necessary on OPNsense anymore.
SSL#
SSL is not needed, but if you are doing any routing for private services you should set this up.
With the ACME plugin and a DNS API provider such as Cloudflare, setup is a matter of Minutes.
Go to Services > ACME Client > Settings and follow the instructions.
Settings
- You want to register DNS for
siteb.example.com - and either get wildcard certificates for
*.siteb.example.com - or a single certificate for
router.siteb.example.com. - Use the
DNS-01Challenge Type and - use Automations to restart the WebGUI after retrieval of new Let's Encrypt Certificates.
The benefit of using DNS-01 Challenge Type is that no actual traffic will need pass the public IP
of OPNsense (that is no ports need to be opened).
Furthermore, if clients on Site B are supposed to reach services on Site A, the DNS service must be configured.
The two options
-
go to
Services > DHCPv4 > [LAN]- add
192.168.10.1as the DNS server to be handed to clients - in this case, OPNsense will get DNS from the pfSense side, where you can configure your service names (e.g.
nextcloud.sitea.example.com->192.168.40.50) - this may slow down clients on the OPNsense network, because all DNS requests need to pass IPSEC
- add
-
if you have few services that only change infrequently, a better approach is to set up
DNS Overrideson OPNsense- go to
Services > Unbound DNS > Overrides - add a host:
- Host:
nextcloud - Domain:
sitea.example.com - Type:
A (IPv4 address) - Value:
192.168.40.50 - Description: private nextcloud instance
- Host:
- after adding Overrides in OPNsense, you need to click "Apply" or restart the Unbound DNS Service
- check that clients get the correct DNS and open
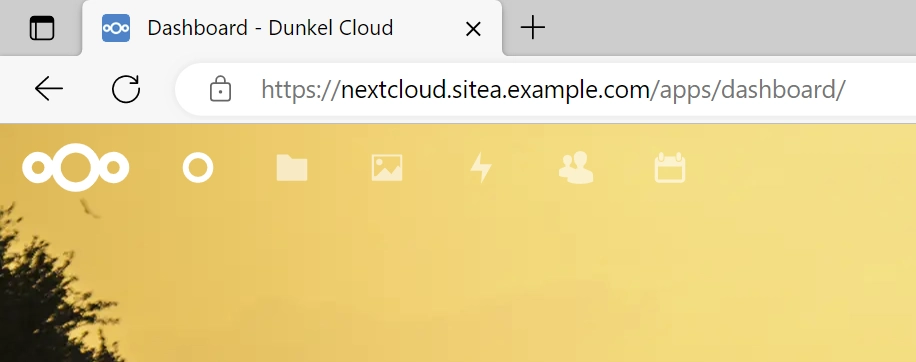
nextcloud.sitea.example.com - this should forward you to the webserver port 443 of your nextcloud instance, served privately using Let's Encrypt certificates and routed through IPSEC

- go to
Conclusion#
I used this setup successfully for over a year now for an IPSEC tunnel between the US and Germany.
Having a central routing device is much more convenient than setting up OpenVPN or WireGuard Road Warrior tunnels on all clients.
Any new client accessing the LAN/WiFi of the Protectli will automatically be served with the correct DNS entries and routed accordingly, either through IPSEC for private services or through the local WAN uplink for public traffic.
Bring your Protectli to any location, add two WiFi devices for WAN and LAN, and you have something akin to a Road-Warrior Setup for Groups! E.g. for Workshops, Prototype Demonstrations, or at Conferences. How cool is this?
Debugging#
Logs are your friend here. Check:
- Firewall logs
- IPSEC Logs (
VPN > IPSEC > Log File > Debug) - Use packet capture
- on clients, use
pingordigfor debugging DNS
-
Corporate networks weren't designed for working from home HN 24759037 ↩
-
Always Own Your Platform HN 20145704 ↩
-
Screw it, I’ll host it myself HN 26725185 ↩
-
OPNsense docs: Hello World custom script. ↩
-
"Commercial National Security Algorithm Suite" docs.strongswan.org/ ↩